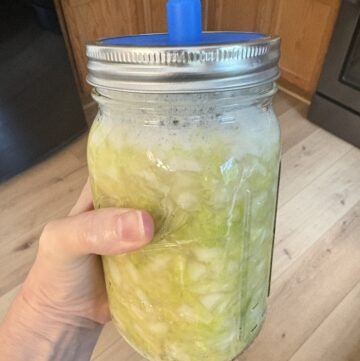
Easy Homemade Sauerkraut

Enjoy this beginner's guide to making homemade Sauerkraut using the 2% salt method.
Equipment
- A digital kitchen scale that measures grams
- A large bowl
- A cutting board and sharp knife, mandoline, or food processor
- Clean glass Mason jar or jars
- A clean utensil or fermentation tamper for packing the cabbage
- A burping or fermentation lid, if you have one
- A plate or shallow dish to place under the jar in case it bubbles over
Ingredients
Green Cabbage
Redmond's Real Salt
Instructions
Step 1: Save a few outer cabbage leaves
- Pull off two or three large, intact outer leaves and set them aside. Rinse if necessary, and discard any that are slimy, moldy, rotten, or badly damaged. We will trim them to fit inside the jars and help prevent shreds from floating.
Step 2: Zero out the scale with your bowl on it
- Place your empty bowl on the scale and press tare or zero. The display should return to zero so it weighs only the cabbage—not the bowl.
Step 3: Chop and weigh the cabbage
- Quarter the cabbage, remove the hard core, and shred or finely slice it with a knife, mandoline, or food processor. Place it in the bowl and write down the weight in grams.
- For example, let us say your shredded cabbage weighs 800 grams.
Step 4: Calculate 2% of the cabbage’s weight
- Multiply the cabbage’s weight by 0.02:
- 800 × 0.02 = 16
- You need 16 grams of salt.
Step 5: Weigh and add the salt
- With the cabbage bowl still on the scale, press tare again. Slowly sprinkle Redmond Real Salt evenly over the cabbage until the display reaches your calculated amount—16 grams for our example.
Step 6: Massage for five minutes
- Using clean hands, massage and squeeze the salted cabbage for about five minutes. It may feel dry at first, but keep going. It will soften and shrink as liquid collects in the bowl. That is your brine—and you want every drop.
Step 7: Pack the cabbage into clean Mason jars
- Transfer the cabbage to a clean Mason jar a handful at a time, firmly packing each layer with your fist, a clean spoon, or tamper. This removes trapped air and pushes the brine upward. Leave about 1 to 2 inches at the top for bubbling and expansion.
- Do not forget the liquid left in the bowl! Pour all of that beautiful cabbage brine into the jar, too.
Step 8: Cover the cabbage with a reserved leaf
- Trim a reserved leaf to fit inside the jar. Place it over the shreds like a little lid and press until the brine rises above it. Tuck its edges beneath the jar’s shoulders or add a clean glass weight if it floats.
- All of the cabbage—including the leaf—needs to remain below the brine. Cabbage exposed to air is more likely to develop yeast or mold.
Step 9: Add the lid
- I use a burping or fermentation lid so carbon dioxide can escape without allowing much oxygen inside.
- With a regular Mason jar lid, “burp” it about once a day: loosen it just enough to release pressure, then close it again. Be careful—an active jar may fizz or push brine upward.
- Set the jar on a plate or shallow bowl to catch any overflow. Ferments sometimes have a mind of their own!
Step 10: Let it ferment
- Place the jar in a cupboard or on the counter away from direct sunlight—somewhere you will remember it, but never in a hot window.
- A room temperature of about 65°F to 75°F works well. Warmth speeds fermentation; cooler temperatures slow it. Above 75°F may produce softer kraut, while below 60°F may prevent proper fermentation.
- You may begin to see bubbles after a day or two. The brine might turn cloudy, the cabbage may lighten in color, and you may hear a little fizz when you open or burp the jar. Those are normal signs that fermentation is happening.
Step 11: Start tasting after a few days
- I start tasting my sauerkraut after a few days. Always use a clean fork, and make sure you press the cabbage back under the brine afterward.
- Young sauerkraut will taste fresher, crunchier, and less sour. As it continues to ferment, the flavor becomes tangier and more complex. Small jars may develop flavor fairly quickly, but a complete traditional sauerkraut fermentation can take several weeks, depending on the temperature.
- There is no magical day when everyone’s tastes perfect. Once yours is as tangy as you like, refrigerate it. Cold dramatically slows fermentation, although the flavor may continue developing. Then enjoy!