Some recipes look good on paper, and then some recipes make you stand in the kitchen eating “just one little piece” before you’ve even finished putting everything away.
These No-Bake Fudgy Brownies with Cashew Cream Frosting are definitely the second kind.
I made these recently when I was craving something chocolatey but didn’t really feel like turning on the oven. I wanted something sweet, fudgy, and satisfying, but I also wanted to keep the ingredients relatively simple and mostly healthy.
The result?
A rich, chewy, chocolatey brownie layer made with Medjool dates, walnuts, cocoa powder, and peanut butter, topped with a creamy cashew frosting that tastes almost like cheesecake meets vanilla frosting.
And they’re no-bake!
That alone makes these worth trying.
Why I Love These No-Bake Brownies
I’m always a fan of recipes that don’t require a lot of fuss, and these brownies are surprisingly easy.
There are essentially two layers.
The first is the fudgy brownie base. Medjool dates provide natural sweetness and a soft, sticky texture, while walnuts add substance and richness to the mixture. Unsweetened cocoa powder delivers deep chocolate flavor, and peanut butter adds even more richness.
For my batch, I used PBfit powder mixed with water, following the package directions, to make ½ cup of peanut butter.
You can absolutely use regular peanut butter, though. Creamy peanut butter works beautifully here.
Then there’s the frosting.
Raw cashews are soaked in boiling water for about 30 minutes before being blended with vanilla, lemon juice, plant milk or coconut cream, and a little maple syrup.
The result is incredibly creamy.
And while I used vanilla bean paste in my brownies because I love those little flecks of vanilla and that extra yummy flavor, you can absolutely use vanilla extract if that’s what you have.
Ingredients You’ll Need
For the Brownie Layer
- 1 cup pitted Medjool dates
- ¼ cup soy milk
- 1 cup walnuts
- 6 tablespoons unsweetened cocoa powder
- 1 teaspoon vanilla extract or 1 tablespoon vanilla bean paste
- Pinch of salt
- ½ cup peanut butter
If you’re using PBfit as I did, mix the powder with water according to the package directions until you have ½ cup prepared peanut butter.
For the Cashew Cream Frosting
- 1 cup raw cashews
- 2 cups of boiling water
- 1 teaspoon vanilla
- 1 tablespoon fresh lemon juice
- 3 tablespoons coconut cream or other plant milk
- 3 tablespoons maple syrup, or less to taste
Optional Toppings
Once your frosting is spread over the brownies, you can leave them completely plain or add your favorite toppings.
Some ideas:
- Mini chocolate chips
- Shredded coconut
- Chopped walnuts or pecans
- Cacao nibs
- A light sprinkle of cocoa powder
- Flaky sea salt
Honestly, they’re delicious either way.
How to Make the Fudgy Brownie Layer
Start by making sure your Medjool dates are pitted. Add the dates and soy milk to your food processor or high-speed blender. The soy milk helps soften the dates and makes them easier to blend into a smooth, sticky mixture. Process until the dates begin breaking down.
Next, add the walnuts. Blend until the walnuts are finely processed and the mixture resembles a thick paste. You don’t necessarily need it to be perfectly smooth. A little texture from the walnuts is completely fine.
Add the unsweetened cocoa powder, vanilla, salt, and peanut butter. Process again until everything is well combined and you have a thick, fudgy mixture.
This is where you’ll want to taste it. Yes, this is an official instruction to eat a little brownie batter.
Check the sweetness and chocolate flavor. If you love a really intense chocolate flavor, you could add a little more cocoa powder. If you like things sweeter, you can adjust to your taste.
I used vanilla bean paste instead of the teaspoon of vanilla extract called for in the original recipe because…well, vanilla bean paste is delectable. If you’ve never used it, those little vanilla flecks are just beautiful, and I love the flavor.
Press the Brownies Into the Pan
Line an 8×8-inch baking dish with parchment paper. I like to leave a little parchment hanging over the sides so the brownies are easier to lift out later.
Transfer your brownie mixture into the prepared dish. Use your hands, a spatula, or the bottom of a glass to press the mixture firmly and evenly into the pan.
Take your time with this step. The more evenly you press the mixture, the prettier your finished brownies will be.
Once the brownie layer is pressed into the pan, place it in the freezer for about 30–60 minutes while you prepare the cashew frosting.
Making the Cashew Cream Frosting
Now for my favorite part. The cashew frosting is what takes these brownies from “easy chocolate date brownies” to something that feels like an actual dessert.
Start with 1 cup of raw cashews. Place them in a bowl and cover them with boiling water. Let them soak for about 30 minutes. Drain the cashews well. Add them to your food processor along with the vanilla, lemon juice, coconut cream or plant milk, and maple syrup.
Blend until creamy and smooth. You may need to stop and scrape down the sides of your food processor a few times. If the mixture seems too thick to blend, add a tiny bit more plant milk, but go slowly. You don’t want the frosting to become too thin.
The goal is a thick, creamy frosting that you can easily spread over the brownies. Give it a taste before spreading it over the brownie layer. If you prefer less sweetness, start with less maple syrup. You can always add more.
The lemon juice might seem like an unusual addition to a chocolate brownie frosting, but it adds just enough brightness to balance the richness of the cashews and peanut butter.
Assemble the Brownies
Once the brownie layer has chilled for 30–60 minutes, remove it from the freezer. Spread the cashew cream frosting evenly over the top. You can make the frosting perfectly smooth or give it some swirls with the back of a spoon.
This is also the time to add toppings. A few mini chocolate chips would be delicious. So would shredded coconut. Or chopped nuts. Or you can do what I did and let the creamy frosting speak for itself.
Return the pan to the freezer for 1–4 hours, until the brownies are firm enough to slice.
How to Serve Them
When you’re ready to eat them, remove the brownies from the freezer and lift them out of the pan using the parchment paper.
Place them on a cutting board and slice into bars. For the cleanest cuts, use a sharp knife. You can also let them sit at room temperature for a few minutes before slicing if they’re very firm.
I personally love these chilled. The brownie layer becomes wonderfully fudgy and chewy, while the cashew cream frosting firms up into a creamy, almost ice-cream-like layer.
And if you’re anything like me, you’ll probably cut one piece…
Take a bite…
And then decide you need another one to make sure the first one wasn’t a fluke. Spoiler: it wasn’t.
A Few Tips for Making These
Use soft Medjool dates.
The dates are doing a lot of work in this recipe. They provide sweetness and help hold the brownie layer together.
If your dates are particularly dry, soaking them briefly in warm water before using them can help soften them. Just drain them well before adding them to the food processor.
Don’t add too much liquid.
When making both the brownie mixture and the cashew frosting, it’s tempting to add more liquid if things aren’t blending right away. Try not to.
The brownie mixture needs to stay thick and fudgy, and the frosting needs to be thick enough to spread. Add additional liquid only a tiny bit at a time, if necessary.
Taste as you go
One of my favorite things about homemade desserts is being able to adjust them.
Like a stronger chocolate flavor? Add a little more cocoa.
Want more vanilla? Go for it.
Prefer a less-sweet frosting? Use less maple syrup.
Recipes are starting points. Your kitchen is where you make them your own.
Easy Variations
There are so many ways you could play around with these.
Chocolate Coconut Brownies
Add shredded coconut to the brownie mixture or sprinkle it over the cashew frosting.
Chocolate Peanut Butter Brownies
Use creamy peanut butter in the brownie base, then drizzle a little more peanut butter over the top before freezing.
Nutty Brownies
Top the cashew frosting with chopped walnuts, pecans, or almonds.
Extra Chocolatey
Add mini chocolate chips to the brownie mixture or sprinkle them over the frosting. You could even blend cocoa powder into the frosting or add a light dusting of cocoa powder over the finished bars.
A Little Sea Salt
If you’re a fan of that sweet-and-salty combination, finish the brownies with a tiny sprinkle of flaky sea salt.
Chocolate + peanut butter + sea salt is hard to beat.
How to Store Them
Because these brownies contain a creamy cashew frosting, I like to keep them chilled. Store them in an airtight container in the refrigerator for several days. You can also keep them in the freezer for longer storage.
If freezing, I recommend placing parchment between the individual bars so they don’t stick together. Then you can pull one out whenever your chocolate craving strikes. Although, let’s be honest, I’m not sure how long a batch of these would actually survive in my freezer.
Why No-Bake Desserts Are So Handy
There’s something especially nice about having a dessert recipe that doesn’t require an oven.
Maybe it’s summertime, and the last thing you want to do is heat the kitchen. Maybe you’re looking for something easy to make ahead. Or maybe you don’t consider yourself much of a baker.
No-bake desserts can be wonderfully forgiving.
There’s no need to worry about whether the brownies are underbaked or overbaked. No oven temperature to monitor. No waiting for the kitchen to cool down afterward.
Just blend, press, chill, frost, freeze, slice, and enjoy. That’s my kind of baking.
The Bottom Line
These No-Bake Fudgy Brownies with Cashew Cream Frosting are among those recipes that remind me dessert doesn’t have to be complicated to be delicious.
They’re rich and chocolatey, wonderfully fudgy, creamy on top, and made with ingredients I can easily recognize.
They’re also incredibly easy to customize.
Add coconut, chocolate chips, nuts, a little flaky salt, or don’t add anything at all.
And while I’m calling them brownies, they’re really whatever you want them to be: an afternoon treat, a little something sweet after dinner, a freezer dessert for when friends come over, or simply something to keep in the refrigerator when that chocolate craving hits.
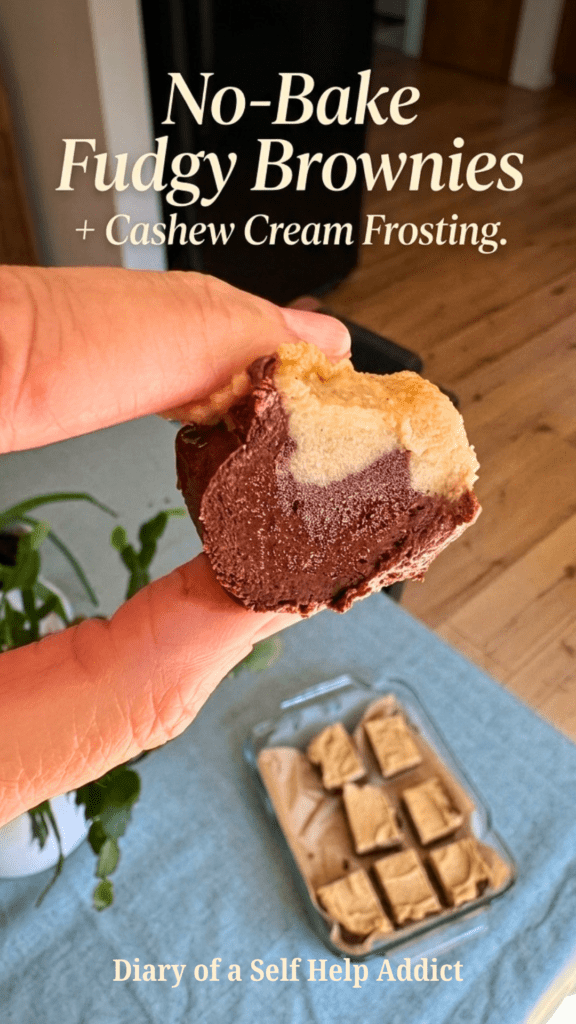
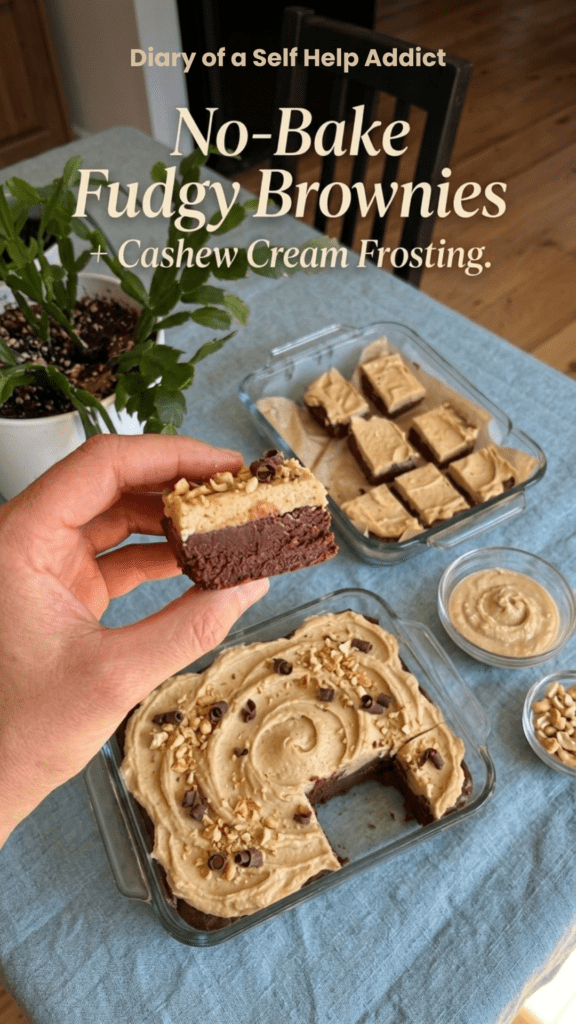
And yes, I did take the picture for this recipe with a bitten piece in my fingers.
Because sometimes you have to taste-test before you finish taking pictures.
Would I make these again? Absolutely. In fact, I’m already thinking about the next batch.
No-Bake Fudgy Brownies with Cashew Cream Frosting
Equipment
- Food Processor OR High-Speed Blender
Ingredients
Brownie Layer Ingredients
- 1 cup pitted Medjool dates
- ¼ cup soy milk
- 1 cup walnuts
- 6 tablespoons unsweetened cocoa powder
- 1 teaspoon vanilla extract or 1 tablespoon vanilla bean paste
- Pinch of salt
- ½ cup peanut butter
Cashew Cream Frosting Ingredients:
- 1 cup raw cashews
- 1 teaspoon vanilla
- 1 tablespoon lemon juice
- 3 tablespoons coconut cream or plant milk
- 3 tablespoons maple syrup or less to taste
Instructions
Brownie Layer Directions:
- Add dates and soy milk to a food processor or high-speed blender and process until the dates begin to break down.
- Add walnuts and blend until the mixture forms a thick paste.
- Add cocoa powder, vanilla, salt, and peanut butter. Blend until well combined.
- Press the mixture firmly into a parchment-lined 8×8-inch baking dish.
- Freeze for 30–60 minutes.
Cashew Cream Frosting Directions:
- Soak cashews in boiling water for 30 minutes.
- Drain well.
- Add cashews, vanilla, lemon juice, coconut cream or plant milk, and maple syrup to a food processor.
- Blend until smooth and creamy.
- Spread over the chilled brownie layer.
- Return to the freezer for 1–4 hours.
- Remove from the freezer, slice into bars, add optional toppings, and enjoy!
A Note From My Kitchen
I love recipes like this because they don’t have to be perfect.
Make them sweeter. Make them more chocolatey. Add coconut. Add chocolate chips. Swap the peanut butter for another nut or seed butter if you have it. Make them your own!
One of the things I’ve really been enjoying about making more whole-food, plant-based desserts is knowing exactly what I’m putting into them. I love being able to make something delicious for my family using ingredients I recognize and feel good about serving them. It doesn’t mean we never enjoy an indulgent treat—it just means I have another option when I want something sweet that I’ve made myself, from ingredients I chose.
And honestly, that’s one of my favorite parts of cooking at home: taking simple ingredients and turning them into something everyone actually wants to eat.
And if you happen to eat a bite—or two—before the brownies make it into the refrigerator, I won’t tell. 😉
If you make these, I’d love to know what you think! Leave a comment below and tell me what toppings you added, or share a photo and tag me so I can see your creation. And if you love easy, delicious recipes made with real ingredients, stick around and check out some of my other whole-food, plant-based recipes while you’re here! 💚
Pin it for later
Leave a Reply